Sunday, 17 October 2010

Mad about Mad Men

I'm not really sure if I've ever talked about my Mad Men obsession on here... but it is just that.  I am completely obsessed.  Sadly, it is going away for a while, as the season finale airs tonight on AMC.
I may have to start watching from Season One again, just to get through the downtime.

One other thing I did to get through the downtime... I did Mad Men Crafts!  Now I have the most adorable little mini-figs on my fridge!  Here they are, and here's how I did it, just in case you want Don Draper on your fridge too (and really, who wouldn't?)

I also have an obsession with fridge magnets.  I think it has something to do with the fact that we never had magnets on our fridge when I was a kid.  Anyway, I digress.  
First... you'll need to gather your supplies:
  • Dyna Moe's minifigs
  • scissors
  • craft glue
  • magnetic sheet
  • markers (if you're going to colour the minifigs, rather than print them in colour, as I did)
  • Krylon Low Odor Clear Gloss
 Next, you'll need to colour your mini figs and cut them out (easy as pie, right?)
After they're all cut out, arrange them on your magnet sheet.  Try to fit them as close together as possible.  Use your craft glue to glue them down.  Then cut them out from the magnetic sheet.
Arrange your magnets on some scrap paper, newspaper, paper towel, whatever you have lying around.  Hold your can of gloss finish about 20-25cm (about 10 inches or so) away from the magnets, and spray lightly.  Try not to be too forceful, otherwise the ink will run.

Let them dry for at least a half hour, and then they're ready to adorn your fridge!  (This project can obviously, easily be adapted for any sort of printable magnet project - let your imagination run wild!)

Happy Mad Men-watching.  Last week's episode, Don showed us his brilliance.  I wonder what will happen in the finale!
Pin It

Thursday, 14 October 2010

Birthday Treats!

So... I'm a pretty big fan of baking - especially when I can bake and bring it into work for my coworkers, so that I don't end up eating the entire batch of whatever I make.  And I think my coworkers enjoy it too ;)  I'm back on Battle of the Blades again this year, so there are plenty of mouths to feed with treats.

This past Saturday was my birthday, and on Blades, we work through the weekend (Saturday is rehearsal day, Sunday and Monday are show days).  I got home early on Friday night, so I decided to whip up a batch of my favourite, and the easiest truffles ever - from the amazing Bakerella website.  I had tried these before, dipped in white chocolate, but I found them too sweet.  So this time, I dipped the truffles in bittersweet chocolate, and I thought they were perfect.

I wanted to make them a little more special, with a bit of character... so I decided to give them a mouse shape.  They have almond ears, and pretzel tails.
I think they're pretty darn cute.  And I got so many compliments on them throughout the day.  I think I made a little more than 50 of them, and they were completely devoured.  Here's the first batch, chilling in the fridge overnight.


There were further birthday treats for me, when my awesome coworkers surprised me with a cake, (and singing!) in the studio by the rink.  I'm not really someone who's easily surprised (I can usually tell when someone is prepping something like this!), so this was definitely one of the best birthday surprises I've ever received. 


So, I have Tuesday off from work, since I work through the entire weekend, and even though it was a full 3 days after my birthday, I couldn't let it go by without a party with my friends.  And, I don't know if this makes me really weird or not, but I decided that I had to bake my own cake.  And further to that, it had to be a super awesome cake.  I decided I had to make myself a castle.  Haha!

Now, keep in mind, I am FAR from a professional baker, and this is my very first layer cake ever... but this is how I did it.  First, I baked.  I decided on vanilla cake, and I made two 8-inch square pans, plus four cupcakes.  I had originally wanted the cupcakes to be the four pillars on each side of the castle, but I thought they looked too big, after I assembled everything.
 - The bottom layer of the cake is just as is.  (I didn't even level it off, because the only serving dish I had was a plate, and I thought turning the cake upside down and letting the dome sit in the curved area of the cake would make it sit a little better)
- The second layer, I levelled and cut about a half inch off each end. 
- The third layer is actually the part that I levelled, cut into quarters and stacked.
- And the top layer is one of the cupcakes.
- For the pillars and door entrance, I used some of the scraps from the second layer.


After assembling all the pieces together, I "glued" them with rainbow-chip frosting and put the cake in the fridge to set a bit.  After about an hour in the fridge, I created a "crumb" layer of vanilla frosting.  It's a thin layer to help seal in all the crumbs that you might get from frosting the cake after it's been cut like this.  And it made me realize how difficult it is to frost around "pillars" ... man this was hard!   So after I finished this layer of frosting, I put it in the fridge to set again.


The next part was my favourite.  The final layer of frosting, and then piping on some details!  I used the same frosting as the crumb layer, and for the piped bit, I just added some food colouring.  I was originally going to do pink, but at the last minute, I decided to do turquoise, to match my apartment! (Yes, I am that much of a geek)  The windows and doors are made of graham crackers, and the little posts are marshmallows.  Here's a look at how the cake turned out:


Again,  not a pro baker here... it may not be the fanciest cake... but it was delicious, and my friends loved it, so that's all that matters, right?! :)
Pin It

Thursday, 9 September 2010

Let's Go To The Ex!

Aahh, 
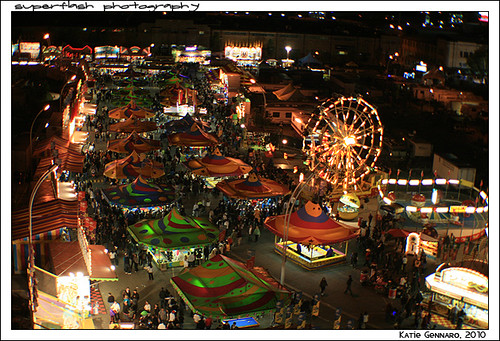
The Ex. Nothing signifies the end of summer in Toronto like the Canadian National Exhibition. For the last two weeks of August, leading up to Labour Day every year, The Ex has been a Toronto tradition since 1879.

And has been my tradition since I was at least 6 years old (I don't believe I've missed a year since then!) My summer just does not feel complete without a visit, or a waffle ice cream.

Oh yes. The focus has definitely switched in recent years. 6-year-old me would have said that the best part of The Ex was the rides (heck, even 16-year-old or maybe 26-year old me would've said that too!) But ask me now, and the food is definitely top priority.

I went to The Ex with my aunt, Ester. It was about 6:30pm when we got there. First stop: the Food building. I already had brunch earlier in the day, but she hadn't eaten. So, we ended up picking up some perogies, and we sat out on the grass enjoying our dinner. Afterwards, she enjoyed some BBQ corn on the cob, while I looked at it longingly (I can't eat corn on the cob anymore, because of a wire I have behind my teeth as a result of my orthodontics... oh, and I had a root canal two days earlier and my teeth were still sore).

We walked around the various buildings and exhibits, in an attempt to have the food settle before hitting up the spinny rides. I really enjoyed the brand new Rock 'n Roll theme. They had lots of old, original posters, costumes and artifacts, dating from the 50s through the 90s. You weren't allowed to take photos in the exhibit, but I may have snuck one from outside the exhibit walls. Wink wink.


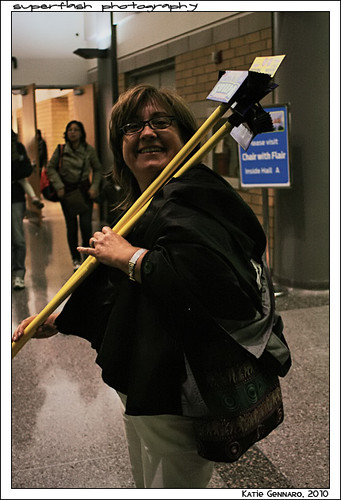
We also made a trip through the At Home building, where we came across a fantastic broom. It's called the sweepa and it looks to be the greatest thing since the bristled broom. We watched as the demonstrator easily transitioned between hardwood, linoleum, tile and carpet, picking up cereal, chip crumbs, pet hair and more, without any extra dust or particles being left behind.  Super impressive. So, the demonstration was awesome... and the brooms were 2 for 1.  It was pretty much a no-brainer.  Afterwards, when we were walking around with them, we had at least 10-15 people stop us to ask where we got them!

At that point, we were going to get out to the midway, but decided that since our brooms were so desireable, we didn't want to leave them on the ground where people could potentially swipe them... so we took a walk back to the car. On the way, we stopped by the Food building again, to parttake in some BeaverTails. BeaverTails are one of those Canadian traditions that I've always wanted to try, but could never find in Toronto (they are particularly popular among the crowds skating down the Rideau Canal in Ottawa). They had a booth in the Food building, and I was determined to buy one. Ester and I decided to split a chocolate hazelnut 'Tail, and it was everything I dreamed it would be, and more! Mmmm...

After we got back from the car, we got our tickets for the rides. We made the mistake of going on the Tilt-A-Whirl first, because it had the shortest line. I have since decided that I am much too old for the Tilt-A-Whirl, and I shouldn't even think about it next year. Oh man. That ride lasts forever, and you just keep spinning and spinning. Thankfully, I didn't lose my BeaverTail (I'm sure it wouldn't have tasted as good on the way up! Sorry for the mental image!), but my equilibrium was off for the rest of the day. We rounded out the rides with the Ferris Wheel, my favourite ride, the Polar Express, and the Swing Tower.

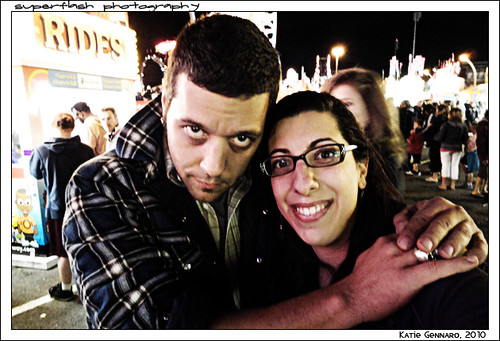
Oh, and while waiting around outside the Polar Express, I ran into my friend, George Stroumboulopoulos... which is becoming a CNE tradition in itself. I'm not sure how I always manage to run into him there! Great seeing him though. His revamped season 7 gets a new name, a new website, and premieres on September 20th. Be sure to check it out on CBC.


After the rides, there was only one more thing to do... waffle ice cream! As I said before, summer is just not complete without one. Picture if you will... a brick of vanilla ice cream, sandwiched between two piping hot waffles. So. Good. Because we were both still off balance from the rides, and somewhat full from the BeaverTail, Ester and I decided to split our waffle... and it was the perfect end to a perfect (short) trip to The Ex!

Photos, you say? Right this way.
Pin It

Friday, 6 August 2010

How To: Digital Inspiration Boards

So, I don't know if I ever officially mentioned it on my blog or not, but I bought a condo a few months ago.   (!!! Still very excited!)  As soon as I saw it, I immediately had ideas of what it would look like once I got my decorative touch on it.  I had a pretty long closing (3 months), so I had a lot of time to think and browse for various decor ideas.  I put them all together in various inspiration boards for each room, which were a definite hit when I posted them on my facebook/flickr pages - so here's a tutorial on how to do it.  This does take a little bit of knowledge on using a photo manipulation program like Photoshop.

The first thing I did was create a folder on my computer called "Condo Decor Ideas" - and within the folder, I created subfolders for each room in the place.  I already knew that I wanted a black & white bathroom, a pink & black damask bedroom, and a turquoise/teal & neutral kitchen/living area (it's open concept) - so I began searching the web for different items that fit my vision.

While searching, I would save any items that I thought I would like into the subfolders.  If I came across any pages that didn't allow me to right click on the image, I would screencap it (ctrl + shift + 4 on a Mac) - I tried to capture the price on the image whenever possible, that way I could reference it later as well.  And when I saved the image, I would name it including the website where I found the image (ie "waterfall_curtain_urbanoutfitters.com")

Once I had all the items saved that I thought would make a room complete, I began to open them up in Photoshop.  I began with a blank canvas (about 1200x1200, and then scaled it down later).  I opened each individual item up, and deleted the background (either using the magic wand tool, or the eraser - very patiently - depending on what the background of the item was).

Once the backgrounds were deleted, I would drag the image over to the main canvas.  I'd add a text note of what the item was and what website I found it on.

I tried to scale items to what their approximate size would be in the room (IE, the bed is larger than the lamps/picture frames, etc), and I also tried to keep them in the relative location that they might be found in the room (ie, chandelier is on the "ceiling", bed is on the "floor")

When I was satisfied with the placement of everything on the design boards, I scaled them down to a size that wasn't too gigantic, but was still legible (the full size "Girlie Bedroom" board is actually 839x1032 pixels)... added a border and a name, and voila! All done!

I'm a very visual person, so even though I could picture this in my head, I found it a lot easier when shopping to remember exactly how these items worked together.  I even bought several of these exact items for my place, so I can't wait to see how it compares to my design boards once I get it all decorated!

I have a couple more design boards in my "Journey To Home Ownership" album on flickr, right here!
Feel free to post any questions in the comments, I'll try to answer them as best as I can.
Pin It

Saturday, 10 July 2010

Featured!

Just a quick post to mention a few places you can find some of my work around the web. StarFish Entertainment has added some of my shots from the Outlaws & Gunslingers show to the following pages:

Thanks for the continued support! I'm currently in the process of my first big move, so I'm not sure when I'll be able to update. Stay tuned! ;)
Pin It

LinkWithin

Blog Widget by LinkWithin

Share this