Showing posts with label crafts. Show all posts

Friday, 5 November 2010

Washer Necklace

So, pretty much every blog in the craft world has done some take on the washer necklace.  I recently inherited a bunch of washers from the set (yes, everyone looked at me like I was very strange when I got super excited about washers.  But I'm used to everyone looking at me like I'm strange.  No big deal.)... So here's my first washer necklace.  I didn't take any process photos, so if anything's confusing, let me know.

Materials needed:
1 washer
hemp cord
patterned paper
mod podge
diamond glaze


1. Take your washer and trace it onto your paper, opposite side of the pattern you're using, so that the pencil doesn't show through.

2. Cut out, or if you happen to have punches that fit the sizes exactly (lucky you!) use those!)

3. Slap some mod podge down on your washer, and lay the paper (patterned side up) on top.  Let it dry a bit.  (If you like, you can cover the edges or the back with more patterned paper, but I like the look of the washer itself)

4. Lay on a thick coat of Diamond Glaze and let it dry (hardest part! I recommend letting it dry at least overnight, so that you don't end up with any fingerprints on your necklace).

5. Once it's dry, you can take your hemp cord and loop it through the washer.  For the closing, you can add some jump rings and add a clasp, or you can do what I did, and use an adjustable sliding knot.  This is my favourite, because you can change the length of your necklace depending on what you're wearing. Since I didn't take any process photos, here's a tutorial that you can follow along with.


Let me know if you end up trying this out!  Or if you've already tried it, let me know if you have any tips to improve it.
Pin It

Sunday, 17 October 2010

Mad about Mad Men

I'm not really sure if I've ever talked about my Mad Men obsession on here... but it is just that.  I am completely obsessed.  Sadly, it is going away for a while, as the season finale airs tonight on AMC.
I may have to start watching from Season One again, just to get through the downtime.

One other thing I did to get through the downtime... I did Mad Men Crafts!  Now I have the most adorable little mini-figs on my fridge!  Here they are, and here's how I did it, just in case you want Don Draper on your fridge too (and really, who wouldn't?)

I also have an obsession with fridge magnets.  I think it has something to do with the fact that we never had magnets on our fridge when I was a kid.  Anyway, I digress.  
First... you'll need to gather your supplies:
  • Dyna Moe's minifigs
  • scissors
  • craft glue
  • magnetic sheet
  • markers (if you're going to colour the minifigs, rather than print them in colour, as I did)
  • Krylon Low Odor Clear Gloss
 Next, you'll need to colour your mini figs and cut them out (easy as pie, right?)
After they're all cut out, arrange them on your magnet sheet.  Try to fit them as close together as possible.  Use your craft glue to glue them down.  Then cut them out from the magnetic sheet.
Arrange your magnets on some scrap paper, newspaper, paper towel, whatever you have lying around.  Hold your can of gloss finish about 20-25cm (about 10 inches or so) away from the magnets, and spray lightly.  Try not to be too forceful, otherwise the ink will run.

Let them dry for at least a half hour, and then they're ready to adorn your fridge!  (This project can obviously, easily be adapted for any sort of printable magnet project - let your imagination run wild!)

Happy Mad Men-watching.  Last week's episode, Don showed us his brilliance.  I wonder what will happen in the finale!
Pin It

Monday, 15 February 2010

Crafty V-Day Party Part 5: The Photobooth!

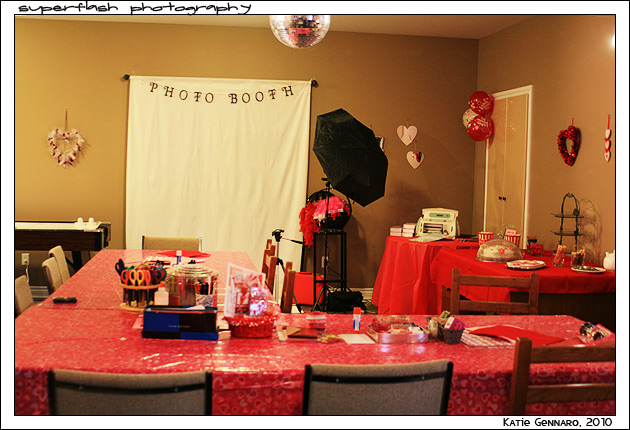
The Photobooth was one of my favourite elements of the party (aside from the crafts themselves). It was a really fun, interactive way to get fabulous photos of my guests. Some of them were really into the idea, a few were a little more reluctant, but I managed to capture all my guests at their best!

I found this tutorial linked on Craft Magazine's blog one day, and knew that I had to attempt this for myself. The photobooth itself was actually quite simple to set up. We hung a curtain rod, with a white sheet draped overtop (it actually ended up being one of my mom's sheets from when she first got married that she never ended up using - it ended up with creases in it, even after washing and ironing twice!) and a white table cloth on the floor. We added a banner that said Photobooth (cut out by Amy with her Cricut), and had a basket of props set up for people to play with (we went with things that were red/pink/white to suit the theme).

The end result ended up being a super fun and creative element, that really added to the party!


I ended up doing a little bit of editing in photoshop (playing with some colours, eliminating seams and creases) but the photos looked great even straight out of the camera. It would be really easy to incorporate this idea into ANY party.

I think this is probably the last element of the party that I'll blog about, though there are still actual "party photos" to come - you can check those out at my flickr photo set in the next couple of days, along with all of the rest of the party photos. Hope you enjoyed this glimpse into my Crafty Valentine's Party - feel free to leave feedback!
Pin It

Saturday, 13 February 2010

Crafty V-Day Party Part 4: The CRAFTS!

The Crafts were what the entire party centred around, so the pressure was on to think of ways to make this party fun and unique, and make everyone want to participate. I think it was pretty successful! It was billed as a "throwback to our elementary school days," where we all went about the day delivering our Valentine's into our classmates little bins, so I had to do something to recreate this feeling.

To begin with - there were loot bags. The loot bags were filled with various party favours, but they served a dual purpose. When guests arrived at the party, their first task was to grab a loot bag (pink for girls, red for boys), and decorate it any way they wished - but it must have their name on it somewhere. The bag itself then became the place where the handcrafted card would be delivered to.

Amy and I had already decorated our own bags the night before (so that everyone could see an example), so while the guests were hard at work decorating, I began working on these mini-cards. I didn't really have any particular idea in mind, I just kept creating. Eventually I made enough for everyone, and they ended up being thank you's, that I dropped in everyone's bag - so they got two Valentine's from the party :)

As soon as everyone was done their loot bags, we put all the guests' names on a slip of paper in a bowl, and everyone drew a slip. They were instructed to give it back if they drew their own name, otherwise the paper said "Create a card for: GUEST NAME." I thought this was a pretty cute idea, because a lot of the guests hadn't even met each other before tonight, so it was a good way to meet new people, and do something nice at the same time! I drew my friend Mat's name, and this is the card that I created for him.

I thought it was really great that everyone, even the boys, were really enjoying just taking the time to be creative (I actually have a hilarious picture of a moment when everyone disappeared from the table to get food, except for two of the guys, who were busily crafting away!) Crafting & Card-Making is something that I do often, but I think it was a bit out of many peoples' realms, so it was neat to be able to share the evening and have everyone get into it.

Plenty more pics, including what was inside the loot bags (I know you're all curious!) up here! Still a lot more to come (there were 200 pics on my camera! So many to sort through!)
Pin It

Wednesday, 10 February 2010

Crafty V-Day Party Part 2: The Decor

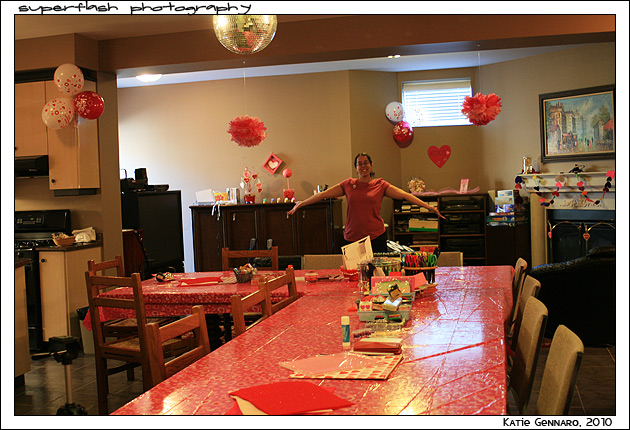
Probably the biggest preparation for the party was working on the decor. I wanted it to be a red and pink wonderland, but without resorting to super tacky decorations that look like they should be found in a classroom. I did buy a few of the elements, but the majority of things were lovingly handmade.

Here's what the main area of the party space looked like:
Amy and I had a sleepover the night before the party, and our goal was to have a splash of pink, red, white or hearts in every place that someone's eyes may have landed. I think we were pretty successful!

Coming down the stairs to the party, this is the first element of decor that guests saw. We had a pink tissue paper puff (made by my sister-in-law), and some vinyl hearts dangling from the ceiling, and pink, yellow and white (fake) flowers in a vase on the corner cabinet. Just a subtle taste of what was around the corner.


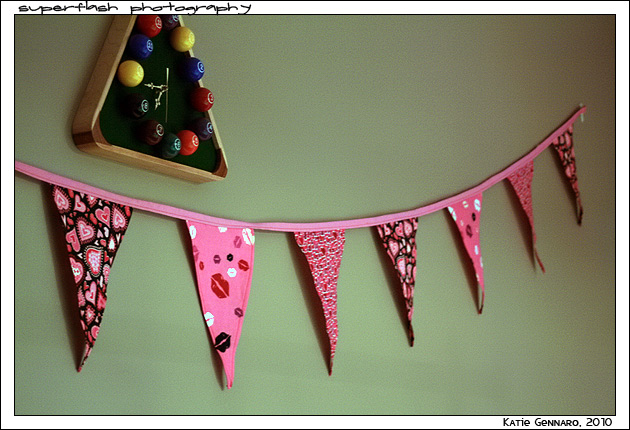
A little further into the basement is the billiards area. Amy sewed this fantastic bunting out of super cute pink fabric, and we hung it on the wall in front of the pool table. (Unexpectedly, the pool table didn't actually get used, because everyone was enjoying their crafts so much, so I'm afraid this wasn't as prominent as it should have been).

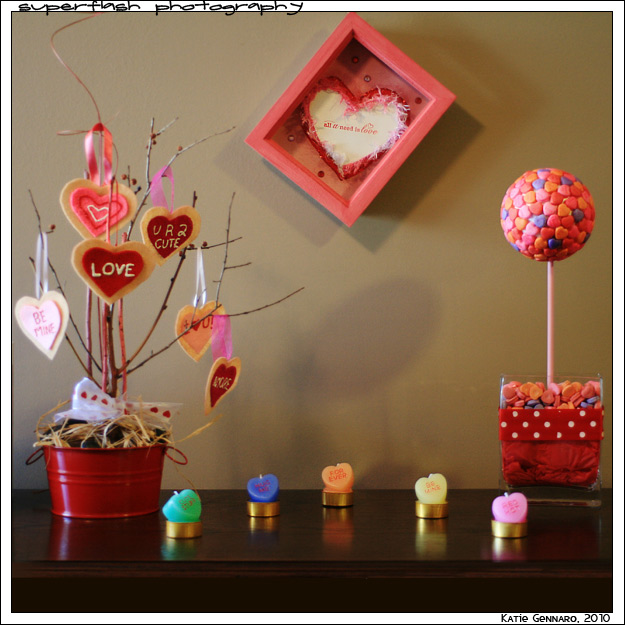
Towards the back of the basement, I had an area set up with the wii + Beatles Rock Band. Against the wall is a large chest, and this was the decor we set out on top of it. The Valentine's Shadow Box hangs on the wall. In front of it is a small Valentine's tree (which was created using the same method as the Easter Tree Centrepiece), with felt heart cookies, made by Amy. The Topiary is made out of Twilight-themed conversation hearts, and was made following this tutorial. Amy also found those super cute conversation heart candles, so we arranged them in front.


I thought some people may find themselves wandering into the kitchen, for ice or cold drinks, or whatever... so I found a cute "love" themed magnetic poetry set at the dollar store, and put them on the fridge. I definitely found some interesting poetry the next day!


So, there were some of the main elements of the decor at my Valentine's party. For more pictures, check out this album on my Flickr.
Pin It

Monday, 8 February 2010

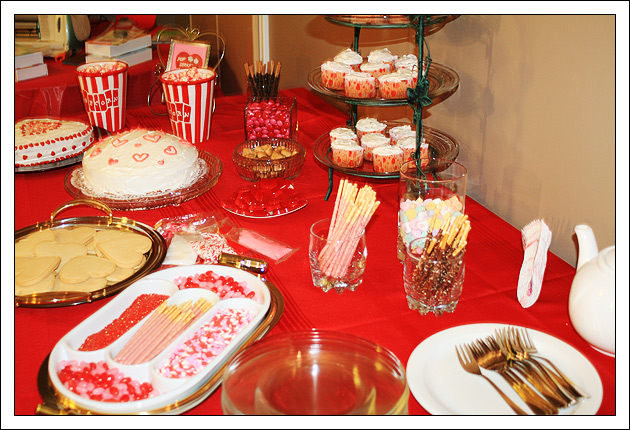
Crafty V-Day Party Part 1: The Sweet Table

On Sunday, with the incredible help of my friend Amy and my mom, I threw a Crafty Valentine's Day Party, which I dubbed "Craft Your Love."

It started out as a simple idea: I wanted to throw a party for my friends, because I hadn't hosted one at all in 2009, and they always love my parties. One friend requested a Christmas party, but I just couldn't manage it with all the other things I had going on at the time. Post-New-Years, I somehow came up with the idea that I should have a Valentine's party, and that everyone should come over to make cards.

This little idea evolved into this fantastic red and pink wonderland, that I would like to share with you! Some of you may have seen little sneak peeks at things, via my flickr or facebook, but I'd like to provide for you a bit of the bigger picture!

First up: the sweet table.

I am a big fan of little details. The sweet table was one of those things that kept on evolving until literally, the start of the party, and came together so nicely in the end!


This is how it looked at the beginning of the night.
Some of the main elements:
heart-shaped cake, made by Christina.
Rainbow cake, made by myself and Amy (and thanks to Melisa for the recipe & directional help with the cake!)
Cupcakes made by Amy

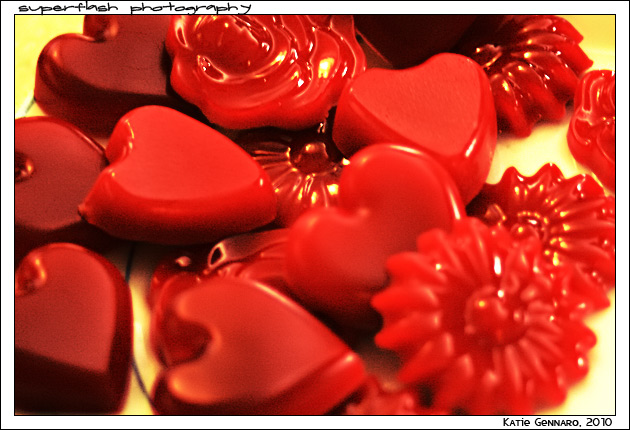
I made some gummy candy, using this tutorial. It turned out pretty cute. Not exactly like gummy bears that you would buy in a store... A few people likened the texture to "old Jello Jigglers" (haha), but the taste and look were amazing.


This was one of the super cute elements that came together in setting up the table the day before. Amy had printed out a whole bunch of vintage Valentines, and we used some of them in a wall-hanging, but there were a bunch left over. As I was flipping through the stack, and noticing an empty picture frame with hearts on it, I noticed this popcorn card, and knew the exact perfect spot for both of these things!


Christina was the first of my friends to arrive. Along with the heart-shaped cake, she also brought me a package of super cute "decorate your own heart shaped sugar cookies"! As soon as I saw these, we decided that we would have a cookie decorating competition! (We had already planned to have a cupcake decorating competition, so all of the sprinkles and candies were already set out). This ended up being a cute element, because along with the fun competition, it also became a way to snap some pictures of my guests with their cookie creations!


There was definitely no shortage of pink and red sweets at this party! Check out my flickr for more detail shots, and watch for more party elements coming soon!
Pin It

Tuesday, 2 February 2010

Valentine's Shadow Box Tutorial

Valentine's Day Shadow Box


So, I'm hosting a "Crafty Valentine's Day" party this weekend, where all the attendees are going to make handmade cards for someone else at the party, and I have a vision of my basement turning into a pink, red and white heart-filled paradise. I've been creating all sorts of little decorative touches, and this is one of them.

Materials:
  • shadow box (I had mine stashed away somewhere, and the glass was actually broken, which is how I came up with this idea)
  • paint
  • paper
  • tissue paper
  • foam-core
  • stamp & ink (and embossing powder/heat gun if you wish)
  • gems
  • glitter
  • fuzzy yarn (you'll only need a small bit of this, so whatever you have around the house will work)
  • tacky glue
  • glue gun
  • Mod Podge
Method:


1. Trace a heart template out of a scrap sheet of paper (I do this by folding a sheet of paper in half, and cutting half a heart, so that both sides are symmetrical. Take your template and trace onto the foam core, and cut out your heart. It doesn't matter if the edges are a little ragged, because they'll be covered by the fuzzy yarn, but try to get it fairly decent looking.


2. Trace the background of your box onto the scrapbook paper of your choice (mine was a dusty rose, subtle print). Once you've cut it to size, use your tacky glue to glue it down into position.


3. Go back to your foam core heart. Stamp your quote (or whatever you choose) in the centre. Mine is a cute little quote from one of my favourite songs ever. I also used a bit of red embossing powder, and fired it with my heat gun for a few seconds, to give it some texture.
Then, take your yarn and glue gun, and in small areas, begin to glue down the yarn to the outside of the heart until you make it all the way around. Cut off any trailing ends you may have.


4. Take your paint and paint the frame of the shadow box (I used a shade of pink that is darker than the scrapbook paper I chose for the background). After it dries, cut a heart out of red tissue paper. Use Mod Podge to glue it down... it doesn't matter if it's crinkly, it'll mostly be covered up... and it gives it a bit of texture, that I kind of like.
Add some glitter around the edge of the red heart.


5. After it's all dry, it's time for the finishing touches. Glue the foam core heart into place with your glue gun. Add some gems for some sparkle... and you're done!

Pretty piece of artwork, using mostly materials that you'll have on-hand (maybe? Is it just me that happens to have all these things kicking around in my basement craft room?)


Anyway... let me know if you try this! It could be used for all sorts of occasions, not just Valentine's Day... just change up the colours and the shape in the middle.


Pin It

Wednesday, 22 July 2009

My altered book is DONE!


Interrupting the Florida recap updates briefly, just so that I can say... I DID IT! My altered recipe book is FINISHED!

I posted a while back (more than a year ago) about my book, but I've actually been working on it for about 4 years now.

Last night, I added in the last few recipes, numbered the pages, added an index and made the cover jacket... and voila! I have finally finished!

170 pages and 4 years later, I have a recipe book!
I think I'm eventually going to take pictures of all the pages and upload them, but until then, you can go here to see a few pictures of the inside, if you like.
Pin It

Monday, 15 December 2008

The Weekend: DM Review, party!

Okay, so I skipped out on Ten Tune Fridays last week. I was just too busy. I thought about posting with my top ten Danny Michel songs, since the concert was on Saturday... but I just didn't have time.
Instead... you get my review of the show today.
Saturday ended up being a crazy busy day for me. I got my hair cut for the first time in months (just haven't had time until now!) and then at 5pm, I started heading downtown to meet Susan and her husband Bernard, for dinner and then the Danny Michel show. We decided to eat right at the Rivoli, where the show was taking place. I had an awesome burger, followed by an even more awesome slice of carrot cake. Mmm, indulgences.

We headed into the show fairly early, and got a table right up front. Total change for me, because I'm used to going to shows either right on time, or even sometimes a little late, to avoid lineups. It was super cool though - because they had tables set up, if we had gone late, I totally wouldn't have been able to see anything. So props to Susan and Bernard for that decision! It was rather interesting seeing a completely bare stage... no drums... no guitars set up... I could tell that we would be in for a good night.

The opening act was a girl named Jenn Grant. Super cute girl. I think the comparisons I drew were to Lindi Ortega (for her between-song banter) & Over The Rhine (for the sultry sound of her voice). Susan and Bernard also drew comparisons to Feist, which is about right, I'd say.


Not too long after Jenn's set finished, Danny Michel took the stage. I'm not sure if you've gathered this yet, but I'll say it again - Danny Michel is my absolute favourite musician ever. I think he is so completely talented in every way. He is definitely my musical crush.


He opened up with Bones, a song both Susan and I were hoping, but not really expecting to hear, so that definitely got things started off on the right foot - not that I expected any less.


Through the course of the evening, he played a LOT of older songs, which was a plus, for sure. Going to a lot of the bigger venue, full-band shows, it seems that he tends to concentrate his setlist on the newest release, but this was a tiny venue, and just Danny on stage. He did also play some new songs, including two of my favourites from the latest album - Tell Sally and Feather Fur and Fin.


Danny ended up playing for almost 2 hours, including the two encores that he was brought back for. Funniest moment - a fan towards the back of the room shouting: "PLAY SNOWGLOBE!" "COME ON, IT'S CHRISTMAS!!!" ..... .... "PLEASE!" LOL, it was just such a Canadian thing to do. Another bit in the encore that was also funny - Danny does this thing when he plays solo gigs where he records different instruments on stage to create a backup loop for his guitar. So he was doing this, and he gets to the xylophone, and the very first note he hits is wrong, and he exclaims "shit, there's a wrong note in there" ... but of course, it was still recording. So throughout the song, if you listened closely, in the loop, you could hear "shit, there's a wrong note in there!"

Hilarious :) It was such a great show.

More pics at my flickr (though I didn't take too many, because I was enchanted by the show!)

On Sunday, Amy hosted what will hopefully become the first of many holiday parties! There were lots of treats, lots of retro throwback movies (including He Man and She Ra's Christmas special!), and great friends! It was definitely good times all around. I baked chocolate cupcakes, and used a piping bag for the icing for the first time - definitely a hit! If you're on my facebook friends, you can view some more pictures there.

Here's me, Annie & Amy, at the beginning of the party.
I still have barely even started my Christmas shopping. I'm completely not in the mood this year - all I want is a vacation. LOL. Sadly, it doesn't seem like I'm going to get one. Is it January yet?
Brief Crafty Ramblings:
THIS is absolutely gorgeous, and I wish I had the time, patience and skill to make it.

THIS on the other hand, is still stylish and pretty, and I think I will make it!

Also a very cool project that I intend on doing when I have time and materials!
Pin It

Sunday, 20 April 2008

Envelope Wall-Hanging Tutorial

Okay, so this is a tutorial for a wall hanging that I made to display my hundreds of postcards. (It won't actually hold a hundred, so I'm going to have to make another one... LOL). Sadly, I don't have a picture of the final version, because I haven't got around to hanging it on my wall yet - but it's coming soon. Hopefully, you'll be able to visualize it... but if you have any questions, just ask :)

For this project, you'll need:
- envelopes (Anywhere from 4-7) of the same size
- collage materials
- stiffer paper/cardstock (I reused the inner tube of a dollar store giftwrap package)
- decorative brad
- string or ribbon
- scissors/glue


1. First, assemble your envelopes. They all have to be the same size, and they have to be able to fit your postcards. I used 5 envelopes, but you could use less (maybe more, but not too many more, because it'll get too heavy to hang).

Arrange them in a vertical line, and glue the flap of the bottom envelope to the "front" (what most people consider the front, but it won't end up being the front for our purposes) of the envelope on top. Keep going until you get to your top envelope, and just leave that one free.


2. Next, you'll take the images that you've cut out for your collage, and begin gluing them onto the envelopes. Be sure to leave all the flaps open, as that's where the postcards (or whatever items you choose) will be stored. I chose pretty travel-inspired pictures, mostly from National Geographic, but you could use any magazine, scrapbooking paper, etc to go with your decor. Keep going, all the way up to the top.

I also cut my pictures a little bigger than I needed, and stuffed them into the pockets, so that they slightly overlap. If you anticipate having a lot of items to fill your pockets, you don't really need to worry about this, but if there's going to be a gap, it's always nicer to see pictures, rather than just white envelope. By the time you're done this step, there should be no envelope seen on the "pocket" side of the hanging.


3. Next step - flip your hanging over, so that you see the back of the hanging (the flaps glued to the "fronts") which should be white. Take your cardstock/heavy paper and cut it to the size of your hanging. Use a whole lot of glue, and stick the cardstock to the envelopes. This is just to reinforce the envelopes a bit.


This is what my hanging looked like at this point. To the right is the full length of the hanging, all covered with images. To the left is the bottom pocket, filled with a few postcards. (Notice how you don't really see the images behind the pockets when they're full... the cityscape is all but invisible back there... so use your favourite images on the actual "pocket" part):


4. The final step is to attach your brad and string. I used a cloth covered brad (super cute, and I found it at the dollar store! Can't beat that!) ... I wrapped the string around the brad before I closed it up. One other thing I did after the fact was reinforce this area with some clear packing tape. I thought that maybe I made my hole a little too close to the top and it would need a little bit of reinforcement. This is more of a judgement call - if you feel like your hanging needs some extra support, I think this is the way to go (or if you have other suggestions for reinforcement, let me know!)


And, you're done! Gorgeous, pro-looking wall hanging that can contain almost anything (you could use it to organize receipts... school assignments... notes... whatever!), and you get to recycle and be creative. Can't beat that!

If you like these kinds of posts... leave a comment :) I'll do more in the future if there's interest in it. I do projects like this all the time.
Pin It

Monday, 24 March 2008

Altered Book

I promised a few people that I'd upload some photos of my altered book. (If you haven't heard of altered books before... check this out)

Mine isn't really a typical altered book, in the sense that most people create altered books as simple art pieces. But when I decided to start mine, I knew that I'd never get through an entire book if I didn't have a specific use for it (like, with my sketchbooks - I'm still using the same sketchbook I started over 8 years ago LOL - I find it hard to get motivated sometimes)

So anyway, I decided to make my altered book into an "altered recipe book" with an additional theme of being "retro" ...

Here's a few pages from my book - If you scroll over where it says "notes" in the pictobrowser, I've added some comments about the pages, materials used, etc.:


Pin It

LinkWithin

Blog Widget by LinkWithin

Share this